
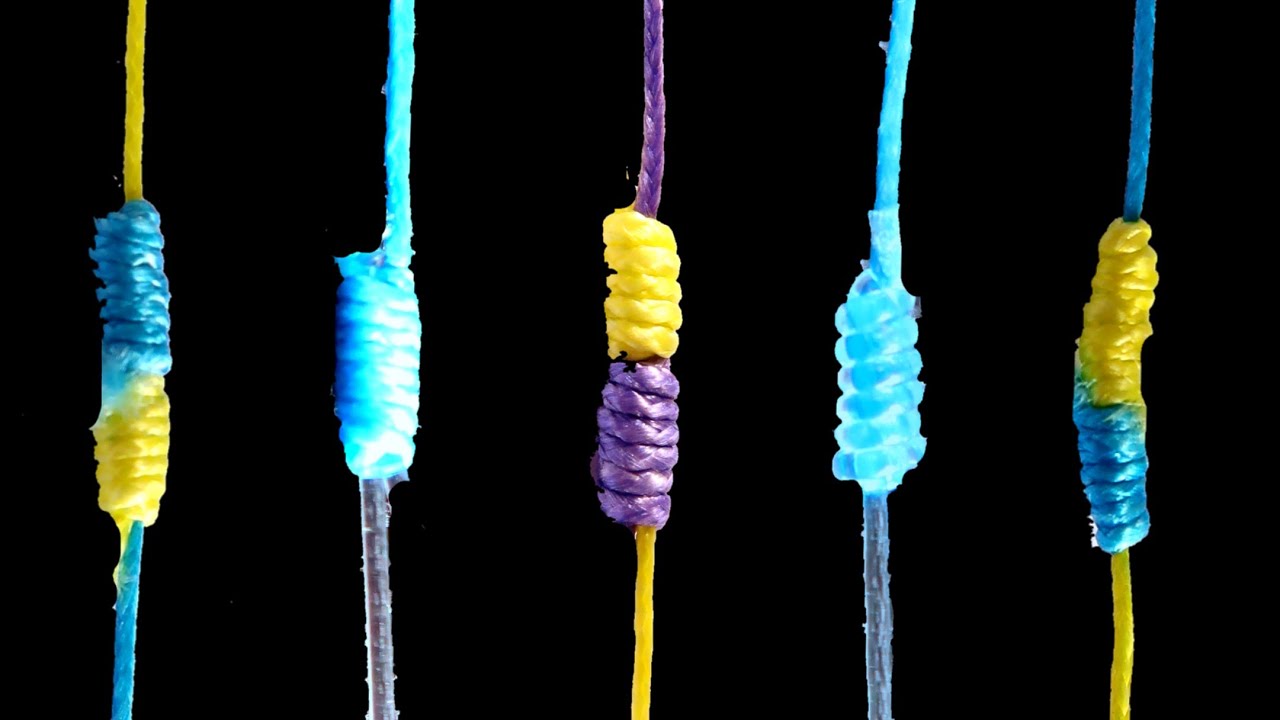
Fishing knots can be the weakest link in your battle with a fish. As a result they are an important thing for you to know. We outline eleven knots for fishing below, each with a specific purpose. When properly tied, then worked into shape, the knot can make all the difference between boating a big bass, or losing it.
 The average angler needs perhaps no more than three or four basic knots for fishing, but these knots relate directly to his mode of fishing. The bass fisherman need have little interest in the knots used by the trout fisherman or saltwater fishermen.
To keep thing simple, select only those knots that are of the greatest use to you. Practice tying them until they become second nature. It is most important that you use knots that can be easily remembered. There is little point using a knot that can only be tied by reference to a book or website – even this one.
A knot is designed to be tied in monofilament line and to run through the eyes and rings of a fishing rod or rig. The emphasis on the knots is compactness reliability with no interest in being able to untie them.
Many knots serve similar purposes and can be interchangeable. As a result you don’t need to know all knots for fishing. Treat this website as a resource to allow you to learn the knots we have found the most useful to bass fishermen.
Bass Fishing Knots – Trilene Knot
Of all the bass fishing knots, the Trilene Knot may be one of the most popular. This fishing knot is a strong reliable connection that resists slippage and premature failures. It is a terrific fishing knot for joining monofilament to tackle .
- Run the end of line through eye of hook or lure and double back through the eye a second time.
- Loop around the standing part of line 5 or 6 times.
- Thread the tag end back between the eye and the coils as shown.
- Pull up tight and trim the tag end.
Uses: The Trilene Knot is an all-purpose connection to be used in joining monofilament to swivels, snaps, hooks and artificial lures.
Tying it: When trimming the tag end, leave about an eighth of an inch for security. The knot’s unique design and ease of tying yield consistently strong, dependable connections while retaining 85-90% of the original line strength.
Advantages: The double wrap of a line through the eye takes some of the strain and may be responsible for claims that this knot retains a high proportion of ideal line strength. The double wrap of mono through the eyelet provides a protective cushion for added safety. This is more likely when the thickness of the eye is greater than the line diameter.
Fishing Line Knot
An easy way to tie an effective fishing knot. A good fishing line knot is something not to be taken for granted. When not tied properly, a poor knot can be the ire of any angler. The best have mastered how to tie fishing knots. You should too if you are intent on tackling northern pike this year.
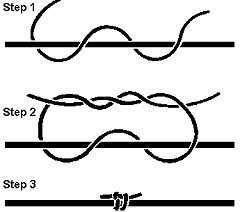
The key to a good knot will not only give your line the needed strength at the swivel or lure, but a good angler knows the way to keep his line from fraying while tying the knot. The method below illustrates a simple method to tie a clinch knot. This is the easiest and among the most effective knots used in fishing. It is likely all you will ever need to know.
- The first step is to run the line through the eye of the swivel. Run it a couple of inches down the standing portion of the line and loop it back toward the eye. Pinch the lines so they are close together.
- The next step is to loop the line 4 or 5 times back down the standing line until you reach the bottom of the loop.
- The key is to make sure your tag end runs through both the lines and the loop as you can see below.
- The last step in this fishing knot is to grab hold of the swivel and the tag and and pull to tighten. The knot should slide toward the swivel giving you a secure fishing knot. Take a small pair of scissors or finger nail cutters and trim the tag close to the standing line giving you a finished product.
There you have it. A secure, tight fishing knot that anybody can do.
Bimini Twist
Another of the most useful knots for fishing is the Bimini Twist. This fishing knot allows the angler to maintain 100% knot strength. This method of doubling your fishing line is popular with offshore anglers to allow for extra pressure to be applied to fish near the side of the boat. The bimini twist is also popular with inshore and fly fishermen to achieve 100% knot strength.
While it may take some practice to learn to tie, the bimini twist is not a difficult knot to tie.
- Double the line in your hands and give it 20 complete twists.
- Place the end with the loop under your foot and over your knee. Take the Tag Ends of the line and evenly spread them at a 45 degree angle. This will draw the wraps tightly together.
- When you get the twists tight and even, pull down with the short end while releasing some tension at the same time. It is helpful to keep up tension with the other hand and with the knee. You will see the relaxed line start to roll over the wraps all the way down to the end.
- When the line has reached the bottom of the twists, secure it with a half hitch on each side.
- Further secure the knot by tying a basic fisherman’s knot.
- Pull the tag end.
- Trim the end.
- The knot should look even without over-twists and slack turns.
And that’s the Bimini Twist. Thanks for reading.
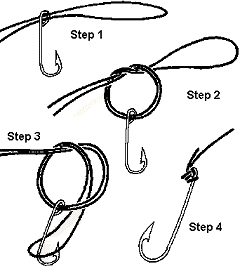
Snell Hook Knot
Tying fishing knots is very easy when you want to attach your line right to a hook. The Snell Hook Knot was designed specifically for that application.
- Pull the mono through the eye of the hook.
- Pull through at least 6 or 7 inches.
- Double the line back and then make several wraps around the shank of the hook, being certain to go through the circle each time.
- Then, pull on the tag end and the knot will tighten up.
- Finally, take the hook in one hand and the line in the other hand and pull both to finish the knot.
And that is the Snell Hook Knot!
The Jig Loop
Thanks for checking out our animated fishing knots. We are now onto the Jig Loop. It is one of the most popular knots for tying line to a jig. This knot is easy to tie and it allows your jig to swim freely. It is recommended for top water plugs and jigs.

Before you put the line through the eye, tie an overhand knot in the line and then run the line through the eye. Bring the end back through the overhand knot.
Then make a simple half-hitch around the line and draw it to the overhand knot. Where you draw the half-hitch to the overhand knot will determine where the loop forms.
And that is the Jig Loop Knot. Pretty easy!
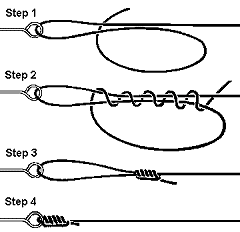
Palomar Knot
My favorite knot. I use only this knot for all applications. The Palomar Knot is another very simple knot for terminal tackle. It is regarded by the International Game Fish Association consistently as the strongest knot known. It’s great virtue is that it can safely be tied at night with a minimum of practice.
 Double about 6 inches of line, and pass through the eye.
- Tie a simple Overhand Knot in the doubled line, letting the hook hang loose.
- Avoid twisting the lines.
- Pull the end of loop down, passing it completely over the hook.
- Pull both ends of the line to draw up the knot.
Hangman’s Knot
There are at least 6 variations of the Hangman’s Knot, all of them excellent for terminal tackle, swivels and hooks. The “standard” Hangman’s Knot holds only five turns when tied in monofilament line. If tied in rope, and used for its stated purpose, it takes eight turns.
 Pass a 8 inch loop of line through the eye.
- Bring the end back on itself, passing it under the doubled part.
- Make five loops over the doubled part.
- The formed knot is worked into shape.
- The knot is sent down the line, against the eye of the hook or swivel.
Float Stop
The float fisherman uses a running float for casting and general handiness, and stops the float from running up the line by using the Float Stop. It has the advantage that the stops moves readily over the rod guides, but grips the monofilament line so tightly that it will not slide over the line
 It should be made with about 6 inches of line, usually the same diameter as the line itself.
- Take 2 turns (3 if necessary) around the main line at the chosen point.
- Bring both ends around to form a Surgeon’s Knot (see above).
- Tighten into shape bringing the coils close together.